# UV
# 安装
# macOS和Linux
curl 安装
curl -LsSf https://astral.sh/uv/install.sh | sh
wget安装
wget -qO- https://astral.sh/uv/install.sh | sh
指定版本安装
curl -LsSf https://astral.sh/uv/0.6.12/install.sh | sh
TIP
实测mac无法使用sh安装,最终使用pipx安装的
# windows安装
使用Powershell安装
powershell -ExecutionPolicy ByPass -c "irm https://astral.sh/uv/install.ps1 | iex"
安装指定版本
powershell -ExecutionPolicy ByPass -c "irm https://astral.sh/uv/0.6.12/install.ps1 | iex"
# pipx安装
pipx install uv
pip也可以安装uv
pip install uv
# 更新
uv self update
# 安装Python
uv可以自动发现系统下已经安装的python
# 安装
uv python install
安装指定版本
uv python install 3.12
安装多python版本
uv python install 3.11 3.12
# 重新安装
uv python install --reinstall
# 查看列表
uv python list
TIP
如果uv使用的python版本不存在,则会自动下载对应版本
# 运行脚本
uv 可以不是用虚拟环境而管理脚本的一来
# 运行
uv run example.py
TIP
如果依赖的是基础目录,直接执行就可以了
带参数执行脚本
# 脚本内容
import sys
print(" ".join(sys.argv[1:]))

# 执行脚本
uv run example.py test
也可以直接从stdin读取脚本
echo 'print("hello world!")' | uv run -
如果是在项目中运行脚本,可以增加--no-project参数来运行脚本前安装项目
# Note: the `--no-project` flag must be provided _before_ the script name.
uv run --no-project example.py
# 有依赖的脚本运行
只需要在执行脚本时,使用--with指定依赖项即可,区别于以前必须创建虚拟环境
# 示例脚本
import time
from rich.progress import track

for i in track(range(20), description="For example:"):
    time.sleep(0.05)

# 运行脚本
uv run --with rich example.py

# 指定特定版本
uv run --with 'rich>12,<13' example.py
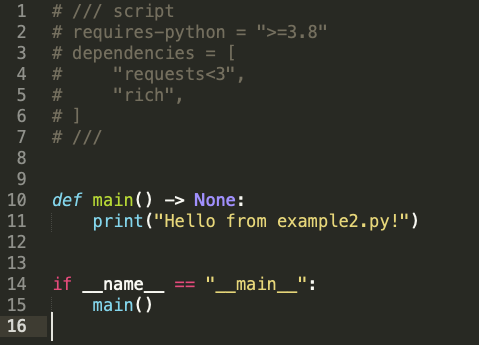
# uv创建脚本
创建一个python脚本,指定python版本
uv init --script example.py --python 3.12
声明脚本依赖
uv add --script example.py 'requests<3' 'rich'
# 锁定脚本依赖
uv lock --script example.py
这将会创建一个脚本名称加.lock的文件,后续执行任何关于该脚本的uv命令,都会更新这个锁文件
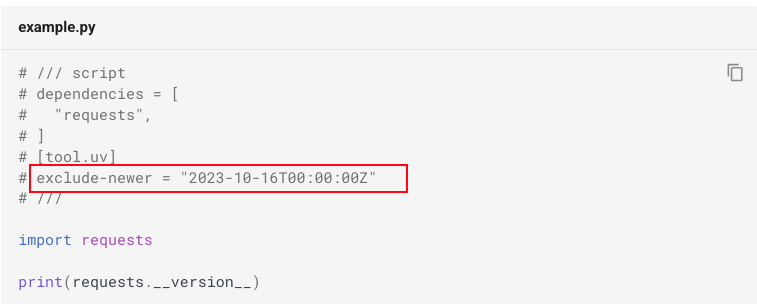
# 限制依赖
通过在脚本元数据[tool.uv]增加exclude-newer限制依赖的时间,达到脚本可复现的目的
# 使用不同的python版本
uv run --python 3.10 example.py
# 使用tool
类似pipx,每一个tool一个环境
# 运行
uvx ruff # ruff是python代码检测工具
# 更改工具名称
有时候安装的工具执行命令并不是包名,可以使用--form指定
uvx --from httpie http
# 指定版本
uvx ruff@0.3.0 check
最新版
uvx ruff@latest check
--form也可以用来指定版本
uvx --from 'ruff==0.3.0' ruff check
指定版本范围
uvx --from 'ruff>0.2.0,<0.3.0' ruff check
# 使用额外功能
uvx --from 'mypy[faster-cache,reports]' mypy --xml-report mypy_report
# 安装tool
uv tool = uvx
uv tool install ruff
# 更新tool
uv tool upgrade ruff
# 指定解释器
uvx --python 3.10 ruff
安装
uv tool install --python 3.10 ruff
更新
uv tool upgrade --python 3.10 ruff
# 项目
# 创建项目
- 初始化项目,会自动创建项目同名文件夹
uv init hello-world
cd hello-world
- 对当前文件夹进行初始化
mkdir hello-world
cd hello-world
uv init
uv降创建如下项目
.
├── .python-version
├── README.md
├── main.py
└── pyproject.toml
# 项目结构
uv初始化后,你如果执行uv run, uv sync或uv lock,还将升成虚拟环境.env和uv.lock文件
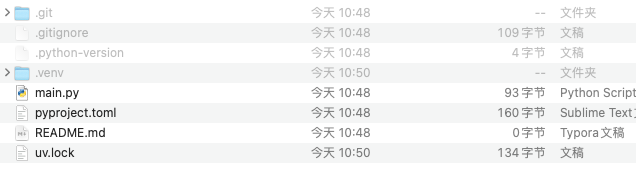
project.toml 项目的元数据
.python-version python版本
.venv 项目环境
uv.lock 管理uv信息,由uv管理,不要手动编辑
# 管理依赖
# 新增依赖
uv add requests
# 新增指定版本依赖
# Specify a version constraint
uv add 'requests==2.31.0'

# Add a git dependency
uv add git+https://github.com/psf/requests
# 从requirements.txt导入
# Add all dependencies from `requirements.txt`.
uv add -r requirements.txt -c constraints.txt
# 移除依赖
uv remove requests
# 更新依赖
uv lock --upgrade-package requests
# 运行
举例,使用flask
uv add flask
uv run -- flask run -p 3000
或者运行一个脚本
# 脚本
# Require a project dependency
import flask

print("hello world")

# 命令
uv run example.py
# 打包
打包文件会输出到当前目录的.dist文件夹,包含whl和源码
uv build
ls dist/